Pin
Pin Whimsical vanilla cake shaped like an adorable bunny, perfect for Easter and spring celebrations. The moist layers are coated in fluffy buttercream and covered with shredded coconut to create a furry texture. Complete with pink fondant ears, candy features, and a bow tie, this festive dessert becomes an instant conversation starter at any gathering.
The first time I attempted a bunny cake, my kitchen looked like a coconut explosion had gone off. I was hosting Easter dinner for eight people and somehow decided 11pm the night before was the perfect moment to get creative with cake shaping and pink food coloring. My daughter walked in, rubbed coconut out of her hair, and asked if the Easter bunny had gotten into a fight. We laughed until we cried, and that slightly lopsided bunny became the most requested dessert I've ever made.
Last spring, my neighbor's little girl saw me carrying the finished bunny cake to their house and actually gasped. She grabbed my hand and whispered that it was the most beautiful thing she'd ever seen, then immediately asked if she could have the bow tie piece. Watching her carefully choose which jelly bean eye would be hers first reminded me why I bother with the extra effort of shaped cakes. Food becomes memory when you take the time to make it whimsical.
Ingredients
- 2¼ cups all-purpose flour: I've learned that spooning the flour into your measuring cup instead of scooping directly prevents dense cake
- 1½ tsp baking powder: Fresh baking powder makes all the difference between a cake that rises beautifully and one that's sad and flat
- ½ tsp baking soda: This works with the baking powder to give the cake that perfect tender crumb
- ½ tsp salt: Don't skip this, it balances the sweetness and makes all the flavors pop
- 1 cup granulated sugar: Room temperature sugar creams into butter much more easily for that fluffy texture we want
- ½ cup unsalted butter: Seriously let this soften completely, or you'll get frustrated trying to cream it
- 3 large eggs: Room temperature eggs incorporate better and prevent the batter from curdling
- 1 cup whole milk: I've used low-fat in a pinch, but whole milk gives such a richer result
- 2 tsp vanilla extract: Use the good stuff here, it's the backbone of all that buttery flavor
- 1 cup unsalted butter for frosting: Cold butter makes grainy frosting, so let it sit out for a good hour
- 4 cups powdered sugar: Sifting this first saves you so much time whisking out lumps later
- 2-3 tbsp milk for frosting: Add this one tablespoon at a time until you reach your perfect spreading consistency
- 1 tsp vanilla extract for frosting: This ties the frosting flavor back to the cake beautifully
- Pinch of salt for frosting: Just a tiny pinch keeps the frosting from being cloyingly sweet
- 2 cups shredded sweetened coconut: The sweetened variety saves you from having to add extra sugar to your coating
- Pink food coloring: Gel coloring gives you more vibrant color without adding extra liquid
- Jelly beans or mini candies: I keep extras handy because somehow half of them disappear during decorating
- Pink and white fondant or marshmallows: Marshmallows are easier for the inner ear detail if you're short on time
Instructions
- Get your oven ready:
- Preheat to 350°F and generously grease two 8-inch round pans with butter, then dust with flour, tapping out any excess
- Whisk the dry ingredients together:
- In a medium bowl, combine the flour, baking powder, baking soda, and salt, whisking until everything is evenly distributed
- Cream the butter and sugar:
- Beat the butter and sugar together for about 3 minutes until it's pale and fluffy, then add eggs one at a time, fully incorporating each before adding the next
- Combine everything:
- Add vanilla to the butter mixture, then alternate adding the flour mixture and milk, starting and ending with flour, mixing just until combined
- Bake the cakes:
- Divide batter evenly between the pans and bake for 22 to 25 minutes until a toothpick comes out clean
- Cool completely:
- Let the cakes rest in the pans for 10 minutes, then turn them onto wire racks until they're completely cool to the touch
- Make the frosting:
- Beat butter until smooth, then gradually add powdered sugar, vanilla, salt, and just enough milk to make it spreadable
- Shape your bunny:
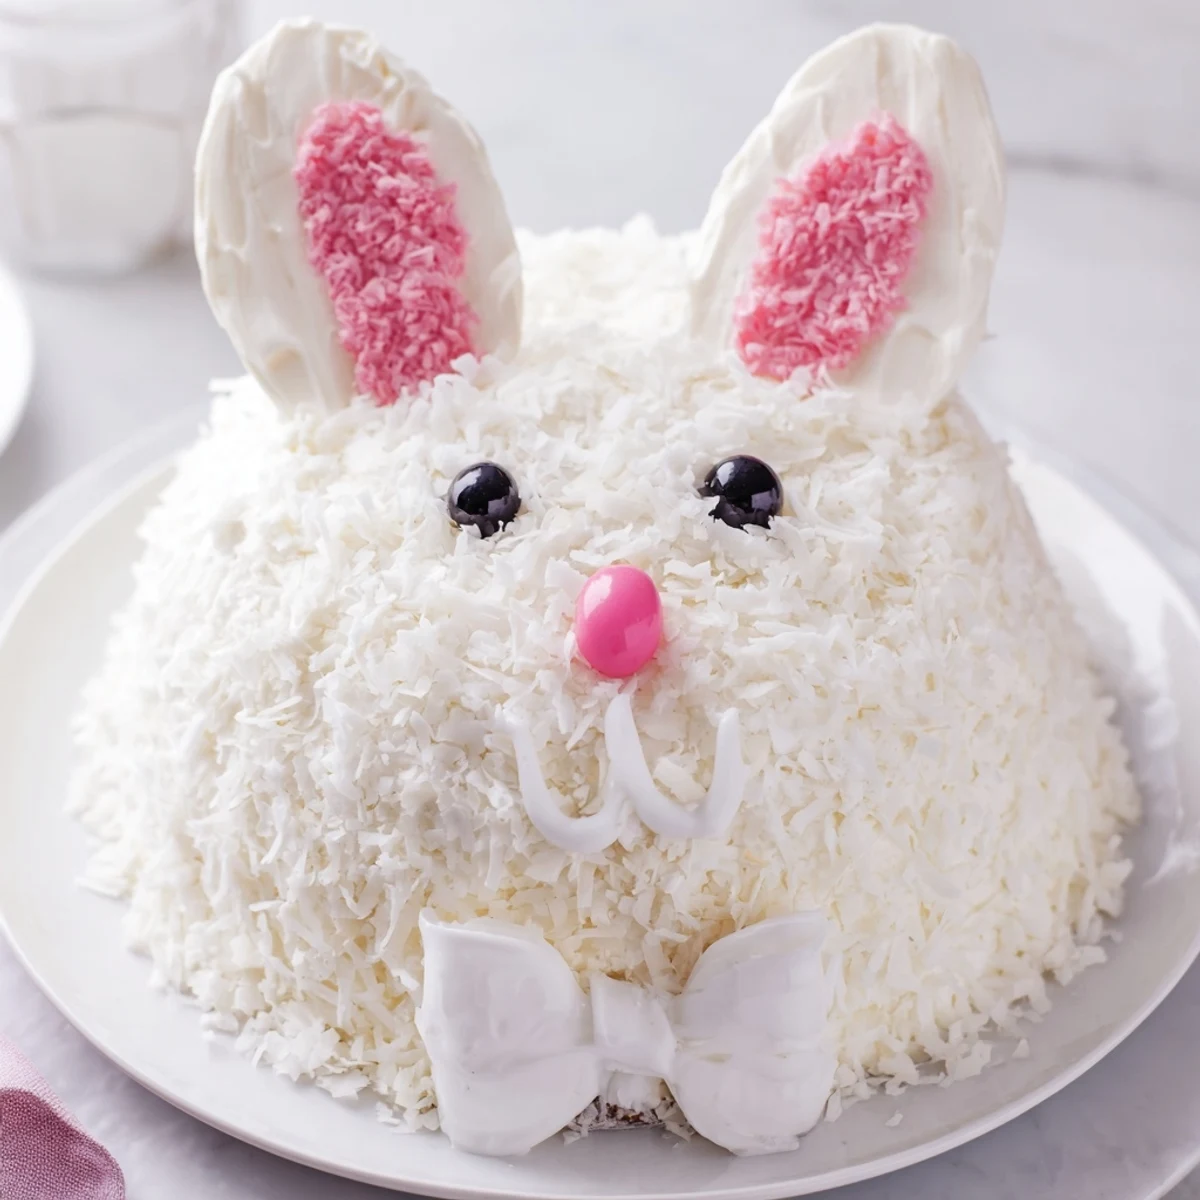
- Leave one cake whole for the face, cut the second cake into two oval ears, and shape the remaining center into a bow tie
- Arrange on the serving tray:
- Position the face, ears, and bow tie close together on your largest platter or cake board
- Apply a crumb coat:
- Spread a thin layer of frosting over everything and refrigerate for 20 minutes to lock in those crumbs
- Coat with coconut:
- Frost the entire bunny generously and press shredded coconut all over for that fluffy fur effect
- Add the pink details:
- Tint a small handful of coconut with pink food coloring and gently press onto the inner ear sections
- Finish the face:
- Add fondant or marshmallow ears and place candy eyes, nose, and any other decorations you'd like
 Pin
Pin My grandmother never made anything but round cakes, yet somehow when I brought this to our family Easter gathering, she immediately claimed the bow tie piece for herself. She said it reminded her of the rabbit cakes in bakery windows when she was a girl in the 1950s, something she'd never gotten to try but always wanted. Now I make one every year partly because it's become tradition, but mostly because I love seeing grown-ups get as excited as children about dessert.
Making It Ahead
I've learned through trial and error that you can bake the cake layers up to two days ahead if wrapped tightly in plastic and stored at room temperature. The frosting can also be made a day in advance and kept in the refrigerator, just let it come to room temperature and give it a quick whip before using. Don't assemble and decorate until the day you're serving, though the coconut can get soggy if it sits too long.
Getting Creative With Shapes
One year I accidentally cut the ears too short and ended up with what my nephew called a baby bunny, which actually turned out to be completely charming. Don't stress about perfect shapes, the coconut covers a multitude of cutting imperfections, and slightly quirky bunnies have way more personality. You can also use the extra cake scraps to make little tail balls or feet if you want to get really elaborate.
Serving And Storage
This cake is surprisingly sturdy once assembled, so it travels well if you're heading to someone else's house for Easter. Cover loosely with plastic wrap or a cake dome, and it will stay fresh at room temperature for about two days. If you need to keep it longer than that, refrigerate it, but bring it to room temperature before serving for the best texture and flavor.
- Use a large offset spatula for smoothing frosting, it makes such a difference
- Have extra coconut handy, you always need more than you think
- Let kids help with the candy placement, their creativity makes it extra special
 Pin
Pin There's something genuinely magical about setting this cake on the table and watching everyone's faces light up, regardless of their age. Hope this bunny becomes a beloved tradition at your spring celebrations too.
Recipe FAQs
- → How do I shape the bunny cake?
-
Leave one round cake whole for the bunny's face. Cut the second round into two equal ovals for ears and shape the remaining center into a bow tie. Arrange all pieces on a large serving tray before frosting.
- → Can I make this cake ahead of time?
-
Bake the cake layers up to 2 days in advance and store wrapped at room temperature. The assembled cake stays fresh covered at room temperature for 2 days or refrigerated for up to 4 days.
- → What if I don't have round cake pans?
-
Square pans work perfectly fine. Simply bake according to the same time and temperature, then trim the corners to create rounded shapes or cut into your desired bunny pieces.
- → Can I use different decorations?
-
Absolutely. Try chocolate shavings, colored sprinkles, or crushed nuts instead of coconut. Use licorice strips for whiskers, chocolate chips for eyes, and any candy you prefer for features.
- → How difficult is this cake to make?
-
This is rated as easy difficulty. The vanilla cake comes together quickly with basic creaming method. The shaping requires simple cutting and arranging, while decorations allow for creative flexibility.